Understanding DIY Kitchen Vanity Decor
DIY kitchen vanity decor is a fantastic way to infuse personality and functionality into your kitchen space. It’s a project that allows you to customize your kitchen to reflect your unique style, while also increasing the value and appeal of your home. Unlike store-bought options, a DIY vanity lets you control every aspect of the design, from the materials used to the final finishing touches. This guide will walk you through the process, from conceptualizing your design to the final reveal of your stunning, self-made kitchen vanity.
Benefits of a DIY Kitchen Vanity
Choosing a DIY kitchen vanity offers a plethora of advantages. First and foremost is the cost savings. DIY projects often allow you to stay within budget by sourcing materials more affordably and avoiding labor costs. Beyond the financial benefits, you gain complete control over the design. This means you can tailor the vanity to your exact space and needs, ensuring a perfect fit and maximizing storage. Moreover, the accomplishment of building something with your own hands adds a unique sense of pride and satisfaction. And, of course, a DIY vanity provides a great opportunity to learn new skills.
Planning Your DIY Kitchen Vanity

Before diving into the construction, careful planning is essential. Start by measuring the available space in your kitchen where the vanity will be located. Consider the plumbing requirements, ensuring access for water lines and drains. Sketch out a preliminary design, including the dimensions, style, and desired features like drawers, cabinets, and countertop. Research different vanity styles and gather inspiration to guide your design choices. Finally, create a detailed list of materials you’ll need, along with estimated costs, to stay organized and on track with your project.
Choosing the Right Vanity Style for Your Kitchen
Selecting the right style is crucial for ensuring your DIY kitchen vanity complements your kitchen’s overall aesthetic. Consider the existing decor, colors, and architectural elements to make an informed choice. Different styles offer unique characteristics and visual impacts, so the options are endless. This ensures your new vanity blends seamlessly with the rest of your kitchen.
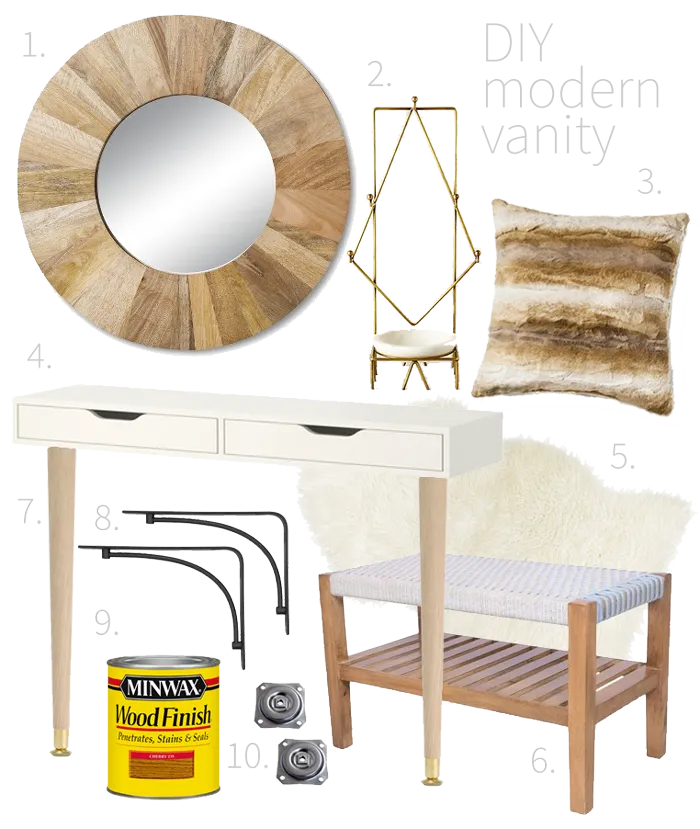
Modern Vanity
Modern vanities are characterized by clean lines, minimalist designs, and a focus on functionality. They often feature sleek, handle-less drawers or cabinets, and neutral color palettes like white, gray, or black. Materials like high-gloss laminates, metal accents, and engineered stone countertops are popular choices. These vanities offer a contemporary look that suits modern kitchens.
Farmhouse Vanity

Farmhouse vanities embrace a rustic and welcoming aesthetic. They typically feature natural wood finishes, often with distressed or painted surfaces, and traditional details like shaker-style doors and exposed hardware. Apron-front sinks, open shelving, and warm, earthy tones like cream, beige, and soft blues are common elements. Farmhouse vanities create a cozy and inviting atmosphere in the kitchen.
Minimalist Vanity
Minimalist vanities prioritize simplicity and functionality. They boast clean lines, uncluttered surfaces, and a focus on essential elements. They are devoid of unnecessary details and decoration. Colors tend to be neutral, with white and light wood tones being popular. Hardware is often integrated or hidden to maintain a sleek look. The design creates an aesthetic that is refined and uncluttered.
Selecting Materials for Your DIY Vanity
The choice of materials significantly influences the look, durability, and cost of your DIY kitchen vanity. Selecting the right materials requires consideration of factors like aesthetics, budget, and maintenance requirements. Research the various options and choose materials that align with your design vision and practical needs.
Wood Materials

Wood is a classic choice for kitchen vanities, offering warmth and natural beauty. Solid hardwoods like oak, maple, and cherry provide durability and can be stained or painted to achieve the desired look. Plywood is also a versatile option for the vanity frame, offering stability and cost-effectiveness. Consider the type of wood and its grain pattern to match your chosen style.
Countertop Materials
The countertop is a focal point of your vanity, so choose a material that complements the overall design. Options range from natural stone like granite and marble, which provide luxury and durability, to engineered quartz, known for its stain resistance and wide range of colors. Solid surface materials like Corian offer seamless designs. Consider the cost, maintenance requirements, and visual appeal when selecting your countertop material.
Hardware and Finishes
Hardware and finishes add the finishing touches to your DIY vanity and elevate its design. Choose cabinet pulls, knobs, and hinges that complement your chosen style, whether modern, farmhouse, or minimalist. Select finishes that provide durability and protection. Consider paint, stain, or varnish for wood surfaces, and ensure all materials are water-resistant to withstand the kitchen environment.
Step by Step Guide to Building a DIY Kitchen Vanity

Constructing your own kitchen vanity can seem daunting, but following a step-by-step guide will simplify the process. The stages include preparing the space and materials, assembling the vanity frame, installing the countertop and sink, and adding storage and finishing touches. With careful planning and execution, you can create a custom vanity that perfectly fits your kitchen.
Preparing the Space and Materials
Before starting construction, clear the area where the vanity will be installed. Gather all necessary tools, including a saw, drill, measuring tape, level, and safety gear. Prepare your materials by cutting wood pieces to the required dimensions, sanding surfaces, and applying any necessary finishes. Ensure you have adequate ventilation and protection to ensure your safety throughout the project.
Assembling the Vanity Frame
The frame is the structural foundation of your vanity. Begin by assembling the base, using wood glue and screws to securely join the pieces. Ensure the frame is square and level. Next, build the cabinet boxes, adding dividers and shelves as per your design. Use a level to ensure everything is straight. This stage requires accuracy and precision, as the frame determines the overall stability and alignment of your vanity.
Installing the Countertop and Sink
Once the frame is assembled, it’s time to install the countertop and sink. Carefully measure and cut the countertop to fit the frame, making sure to accommodate the sink. Depending on the type of sink, you may need to cut a hole in the countertop. Secure the countertop to the frame using appropriate adhesive or screws. Install the sink following the manufacturer’s instructions, connecting the drain and water lines.
Adding Storage and Finishing Touches
Complete your DIY kitchen vanity by adding storage solutions and finishing touches. Install drawers and cabinet doors with appropriate hardware. Consider adding interior shelves and organizers for enhanced functionality. Apply paint, stain, or varnish to the vanity’s exterior, and add any decorative details such as trim or molding. Finally, install the faucet and any desired accessories to complete your project.
Decorating Your DIY Kitchen Vanity
Decorating your DIY kitchen vanity allows you to enhance its visual appeal and personalize your kitchen. The right decor can transform your vanity from a functional element to a stylish focal point. From lighting and mirrors to accessories, consider the options that best complement your vanity’s design and your personal taste.
Choosing the Right Lighting

Lighting plays a crucial role in both the aesthetics and functionality of your vanity area. Consider the type of lighting fixture that suits your design and needs. Options include sconces mounted on either side of the mirror, overhead pendant lights, or integrated LED strips. Choose lightbulbs that provide adequate illumination for grooming tasks and create a welcoming atmosphere. Warm light is ideal for creating a sense of comfort.
Selecting Mirrors and Accessories
The mirror is a key element in the vanity design. Choose a mirror that complements the vanity’s style and size, whether it’s a sleek, frameless design or a decorative framed mirror. Add accessories like a soap dispenser, toothbrush holder, and decorative tray to enhance the vanity’s functionality and add a touch of personality. These small details can significantly elevate the overall look and feel of your space.
Maximizing Storage Space
Maximize storage space in your vanity to keep your kitchen organized and clutter-free. Use drawers, cabinets, and shelves to store toiletries, cleaning supplies, and other essentials. Install drawer organizers, shelf dividers, and pull-out trays to optimize space utilization. Consider incorporating a hidden storage compartment or a pull-out trash bin for added convenience. Efficient organization enhances the functionality and aesthetic appeal of your vanity.
Maintenance and Care Tips for Your DIY Vanity
Maintaining your DIY kitchen vanity is essential for preserving its appearance and extending its lifespan. Proper care involves regular cleaning, protection from moisture, and addressing any potential issues promptly. With a little attention, your vanity will remain a beautiful and functional fixture in your kitchen for years to come.
Conclusion
Building a DIY kitchen vanity is a rewarding project that allows you to create a custom space. By following these steps and tips, you can design and build a beautiful and functional vanity. Embrace the opportunity to personalize your kitchen and enjoy the satisfaction of a job well done. With careful planning and dedication, your DIY kitchen vanity will become a stunning centerpiece in your home.